There’s nothing quite like the tender, cloud like texture of fluffy Japanese milk bread. When I first made this bread in my home kitchen, the result was so soft and buttery I could hardly believe it didn’t have any dairy or eggs. Just a few ingredients, a little patience, and the reward is a loaf that’s perfect for sandwiches, toast, or simply torn apart and eaten warm.
This bread is not just about taste it’s about texture. The key is in the kneading, the rise, and a gentle hand when shaping. Whether you’re baking it as a beginner or revisiting a classic, this recipe is the one you’ll come back to over and over again.
“Fluffy like a pillow, golden like the sun, and soft enough to melt in your mouth this is Japanese milk bread.” – @BakeSoftDreams
Why You’ll Fall in Love With This Bread
- Minimal ingredients: Just flour, yeast, water, sugar, salt, and oil.
- Incredible softness: Thanks to proper kneading and rising.
- Perfect for all meals: Breakfast toast, sandwich base, or served warm with soup.
- No eggs or dairy needed: Yet still rich and satisfying.
- Beginner friendly: A great way to build your confidence with yeast dough.
If you love ultra soft breads, don’t miss our soft and fluffy milk bread and milk brioche recipe they’re both warm kitchen staples in my home.
Ingredients for Japanese Milk Bread
- 200 ml of warm water (about 0.85 cup)
- 25 g of sugar (2 tablespoons)
- 3 g of active dry yeast (1 teaspoon)
- 300 g of bread flour or wheat flour (2 cups)
- 3 g of salt (1/2 teaspoon)
- 20 g of olive oil (2 tablespoons)
Step by Step Instructions
1: Activate the Yeast
- Combine the warm water, sugar, and yeast in a bowl.
- Let it sit for 5-10 minutes until frothy this is when the yeast “wakes up.”
2: Mix and Knead the Dough
- Add flour and salt to the yeast mixture.
- Stir until a rough dough forms, then knead on a floured surface for 10 minutes until smooth and elastic.
3: Add the Olive Oil
- Drizzle olive oil over the dough and knead for another 5 minutes until well absorbed.
4: First Rise
- Place dough in a greased bowl, cover with a damp cloth, and let it rise in a warm place for 1-2 hours.
- It should double in size if not, give it more time.
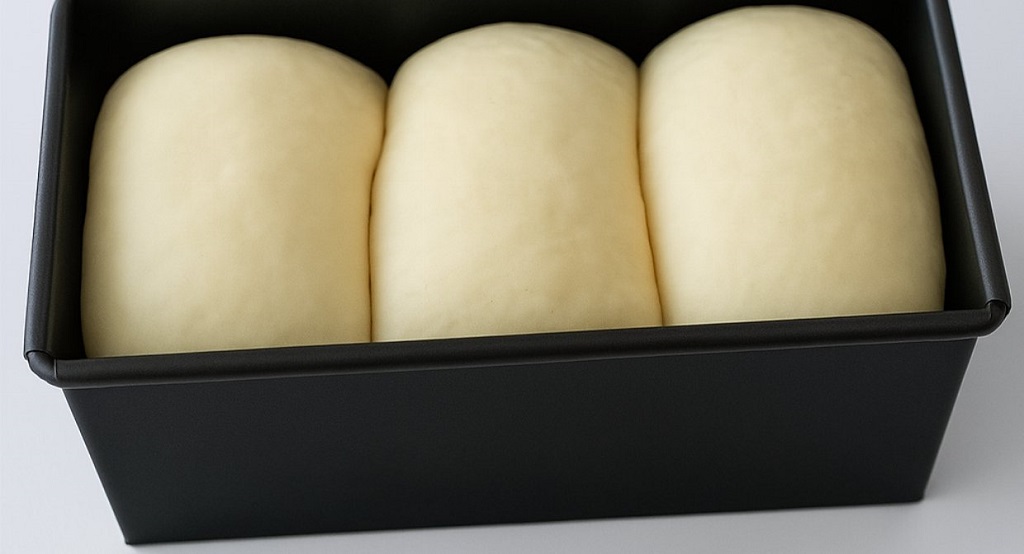
5: Shape the Dough
- Punch down the dough and divide it into equal portions.
- Shape each into a smooth ball and place into a greased loaf pan.
6: Second Rise
- Let the dough rest for another 30-45 minutes until it fills the pan and domes slightly above the rim.
7: Bake
- Preheat the oven to 350°F (180°C).
- Optionally, brush the top with milk for a shinier crust.
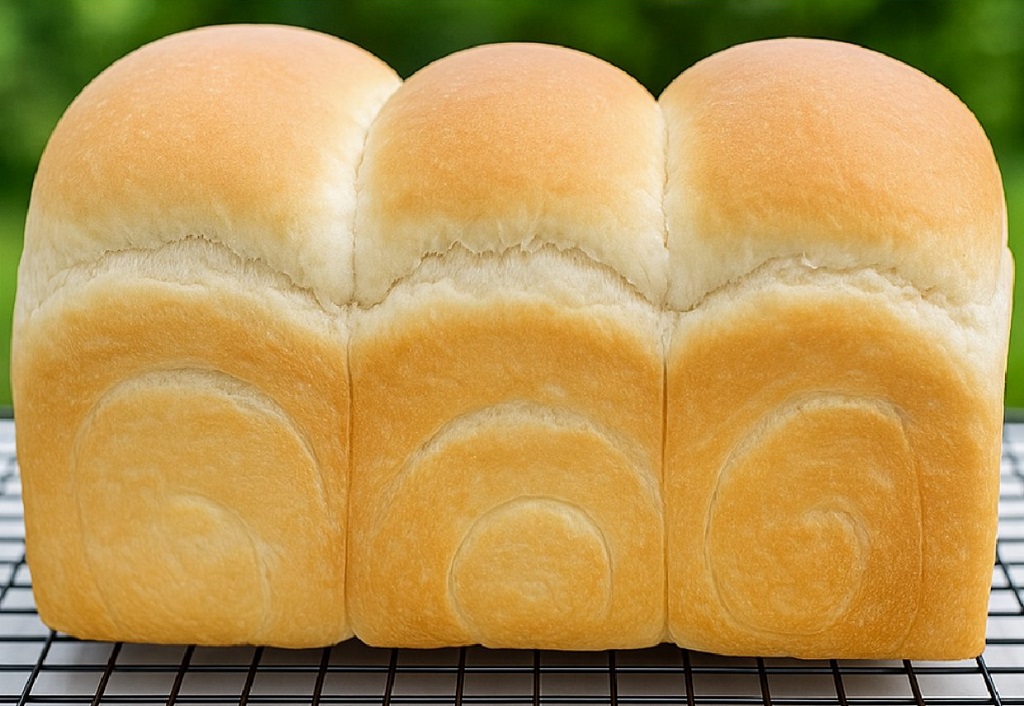
- Bake for 25-30 minutes until golden brown on top.
8: Cool and Enjoy
- Let cool in the pan for 10 minutes, then transfer to a wire rack to finish cooling.
- Slice with a sharp bread knife and enjoy!
Chef’s Pro Tips for the Perfect Loaf
- Use a kitchen scale: Precision is key for fluffy texture. Weigh your ingredients for best results.
- Don’t skip the kneading: This develops the gluten structure for that iconic pull apart crumb.
- Hydration matters: Too much flour = dry loaf. The dough should feel soft and slightly tacky, not stiff.
Want more baking tips? Browse our soft bread dough guide or our fluffy bread loaf tutorial for deeper dives into dough techniques.
“The true magic of this bread is in the rise. Let the dough rest. Let the gluten develop. Then let your tastebuds rejoice.” – @BreadWhisperer
Comparing Japanese Milk Bread to Other Popular Loaves
| Type | Main Ingredients | Texture | Uses |
|---|---|---|---|
| Japanese Milk Bread | Flour, water, sugar, yeast, oil | Soft, airy, slightly sweet | Toast, sandwiches, plain |
| French Brioche | Flour, eggs, butter, sugar | Rich, buttery, soft | French toast, dessert loaves |
| Italian Focaccia | Flour, water, olive oil, salt | Chewy, oily, crispy top | Side dish, sandwiches |
| Standard White Bread | Flour, water, yeast, salt, sugar | Soft, but firmer crumb | Everyday toast, grilled cheese |
Serving Suggestions and Pairings
- With spreads: Peanut butter, Nutella, or classic butter and jam.
- Turn into French toast: Slice thick and soak in egg mixture, then pan fry.
- Use as sandwich bread: Fill with egg salad, cucumber slices, or cold cuts.
- Pair with soup: Try it alongside our vegetable soup or cowboy soup.
Why Japanese Milk Bread Is in a League of Its Own
The Secret Behind Its Signature Softness
What sets Japanese milk bread apart from other types of bread is its tender, almost feathery crumb that pulls apart in delicate strands. As a chef, I often refer to this as the “cotton cloud” effect where every slice feels like a bite into a cloud. This texture comes down to three essential factors:
- Hydration: Japanese milk bread uses a slightly higher water to flour ratio than standard sandwich bread, which allows the gluten to stretch better and trap air.
- Oil enrichment: Olive oil helps soften the dough and gives it a tender finish without heaviness.
- Gentle proofing: Letting the dough rise slowly and evenly creates a tight, uniform crumb without large holes.
Mastering these techniques may take time, but once you do, it becomes second nature. For other examples of soft, enriched doughs, explore our milk brioche or cloud soft condensed milk bread, both of which showcase the magic of slow fermentation and fat incorporation.
“You don’t just make Japanese milk bread you nurture it. The result? Fluffy perfection.” – @DoughWhisperer
How This Bread Differs from Other Global Favorites
Every culture has its signature loaf France has brioche, Italy has focaccia, and the U.S. loves white sandwich bread. But what makes Japanese milk bread stand out is its perfect balance of structure and softness. It’s light without being airy, rich without being heavy, and versatile without being bland.
| Bread Type | Texture | Key Fat | Best Use |
|---|---|---|---|
| Japanese Milk Bread | Feathery, moist, light | Olive oil (or sometimes butter) | Toast, sandwiches, rolls |
| Focaccia | Chewy, crusty, oily top | Olive oil | Side bread, snack |
| Pound Cake | Dense, buttery, crumbly | Butter | Dessert, tea time |
| Banana Bread | Moist, tender, hearty | Oil or butter | Snack, breakfast |
| Milk Buns | Springy, pillowy | Milk, butter | Sliders, rolls |
This comparison shows that while many breads are soft, Japanese milk bread has a balance and structure that makes it ideal for both sweet and savory applications.
Creative Ways to Use Japanese Milk Bread
I often bake a double batch of this bread just to have leftovers for experimentation. It’s a blank canvas for endless creativity. Here’s how I like to serve it:
- Breakfast toast: Toast thick slices and top with whipped cream cheese, berries, and a drizzle of honey.
- Gourmet grilled cheese: Use two buttery slices filled with mozzarella and tomatoes, then pan grill until golden.
- French toast: Dip slices in egg milk mixture, pan fry until golden, and dust with cinnamon sugar.
- Mini sliders: Shape the dough into small buns and fill with pulled chicken or veggie patties.
You can also enjoy it with our cucumber salad for a fresh contrast or pair it with crispy chicken for a satisfying meal.
“This bread absorbs sauces like a sponge but holds its shape like a champ it’s the bread MVP.” – @CrumbCatcher
Flavor Upgrades and Add Ins
One of the joys of baking at home is personalizing your recipes. This milk bread is a dream to work with and takes well to custom additions:
- Sweet: Add chocolate chips, raisins, cinnamon sugar swirls, or brush with honey glaze after baking.
- Savory: Mix in cheese, sautéed onions, garlic, or herbs like rosemary and thyme.
- Nutty: Fold in toasted almonds, pecans, or sunflower seeds for texture.
For a sweet variation, try pairing it with our strawberry cheesecake spread or the indulgent Reese’s caramel cheesecake.
“You can take this loaf from classic to crazy with just a handful of mix ins.” – @BreadHacks
Make Ahead and Storage Tips
If you’re like me, once you make this bread, you’ll want to enjoy it for more than just one meal. Here’s how to extend its life and freshness:
- Same day serving: Bake in the morning and enjoy it fresh it’s best within 6 hours of baking.
- Short term storage: Keep in an airtight container or bread bag at room temperature for up to 3 days.
- Long term freezing: Slice, wrap in parchment paper, and store in a freezer safe bag for up to 30 days. Reheat in a toaster or oven.
- Reviving old slices: Warm gently in a toaster oven with a touch of butter or sprinkle with water and bake for 5 minutes at 300°F (150°C).
Many of these storage tips also work for other baked favorites like Nutella doughnuts or baked pumpkin donuts.
“Bread shouldn’t just be eaten fresh it should be enjoyed all week with the right storage and care.” – @LeftoverLuxe
Nutrition Facts (Per Serving – Based on 10 Slices)
- Calories: 150
- Total Fat: 4g
- Carbohydrates: 25g
- Protein: 4g
- Fiber: 1g
- Sodium: 180mg
Frequently Asked Questions
Can I use all purpose flour instead of bread flour?
Yes, but bread flour will give you a stronger gluten network and a fluffier result. If using all purpose, knead slightly longer.
What’s the best way to store leftovers?
Wrap in plastic wrap or keep in a bread box at room temperature for up to 3 days. You can also freeze it for up to 1 month.
Can I make this into rolls?
Absolutely. Divide the dough into 9 to 12 pieces and place them in a greased baking dish. Bake for 20-22 minutes at 350°F.
Can I double the recipe?
Yes. Use a larger bowl and pan, and increase the baking time by 5-8 minutes depending on size.
Why didn’t my dough rise?
Check your yeast (it might be expired), ensure your water was warm (not hot), and give it more time if your kitchen is cold.